We aims to provide in house support to our colleagues and the Engineers for any sort of technical help.You can raise your technical queriesor browse for any solutions for the probelms through our groups.We provide driver support,OS support and utility support too to make your life a better one.

Our Mission

Transform HCL Infosystems LTD into services and solution centric organization

Showing posts with label Linux. Show all posts

Wednesday, January 25, 2012

The ext3 file system in Linux

The ext3 filesystem, developed by RedHat extends the popular ext2 filesystem with the introduction of journaling.

What is a Journaling Filesystem?

A journaling filesystem keeps a journal or log of the changes that are being made to the filesystem during disk writing that can be used to rapidly reconstruct corruptions that may occur due to events such a system crash or power outage. The level of journaling performed by the file system can be configured to provide a number of levels of logging depending on your needs and performance requirements.

What are the Advantages of a Journaling Filesystem?

There are a number of advantages to using a journaling files system.

Both the size and volume of data stored on disk drives has grown exponentially over the years. The probelm with a non-journaled file system is that following a crash the fsck (filesystem consistency check) utility has to be run. fsck will scan the entire filesystem validating all entries and making sure that blocks are allocated and referenced correctly. If it finds a corrupt entry it will attempt to fix the problem. The issues here are two-fold. Firstly, the fsck utility will not always be able to repair damage and you will end up with  data in the lost+found directory. This is data that was being used by an application but the system no longer knows where they were reference from. The other problem is the issue of time. It can take a very long time to complete the fsck process on a large file system leading to unacceptable down time.

A journaled file system records information in a log area on a disk (the journal and log do not need to be on the same device) during each write. This is a essentially an "intent to commit" data to the filesystem. The amount of information logged is configurable and ranges from not logging anything, to logging what is known as the "metadata" (i.e ownership, date stamp information etc), to logging the "metadata" and the data blocks that are to be written to the file. Once the log is updated the system then writes the actual data to the appropriate areas of the filesystem and marks an entry in the log to say the data is committed.

After a crash the filesystem can very quickly be brought back on-line using the journal log reducing what could take minutes using fsck to seconds with the added advantage that there is considerably less chance of data loss or corruption.

What is a Journal Checkpoint?
When a file is accessed on the filesystem, the last snapshot of that file is read from the disk into memory. The journal log is then consulted to see if any uncommitted changes have been made to the file since the data was last written to the file (essentially looking for an "intention to commit" in the log entry as described above). At particular points the filesystem will update file data on the disk from the uncommited log entries and trim those entries from the log. Committing operations from the log and synchronizing the log and its associated filesystem is called a checkpoint.
What are the disadvantages of a Journaled Filesystem?

Nothing in life is is free and ext3 and journaled filesystems are no exception to the rule. The biggest draw back of journaling is in the area of performance simply because more disk writes are required to store information in the log. In practice, however, unless you are running system where disk performance is absolutely critical the performance difference will be negligable.

What Journaling Options are Available with the ext3 filesystem?

The ext3 filesystem provides three options. These are as follows:
  • writeback - greater speed at the price of limited data integrity. Allows old data to show up in files after a crash and relies on kernel's standard writebacks to flush buffers.
  • ordered -  that the data is consistent with the file system; recently-written files will never show up with garbage contents after a crash at the cost of some speed.
  • journal - Journals all data requiring greater journal space and reduced performance. The most secure data retention policy.
Does the Journal log have to be on the same disk as the filesystem?

No, the ext3 journal log does not have to be on the same physical device as the filesystem it is logging. On a RedHat Linux the journal device can be specified using the journal_device= option with the -journal-options command line argument of the tune2fs utility.

Monday, July 12, 2010

Installing Oracle9i on Red Hat Linux 7.1 - 7.2

  Overview
This article is a comprehensive guide for installing Oracle9i (9.0.1 and 9.2.0) on the Red Hat Linux 7.1 and 7.2 operating environment. Keep in mind the following assumptions:
Downloading / Unpacking Oracle9i Installation Files
Swap Space Considerations

Known Issue #1 : (Error with Oracle 9.0.1 during linking of ins_plsql.mk)
The "binutils" package that ships with Red Hat 7.1 and Red Hat 7.2 will not work with Oracle 9i. You will see this bug show up during the "link" phase at around 62% when trying to link PL/SQL (ins_plsql.mk)
You have three options to get around this bug:

Known Issue #2 : (Error with Oracle9i during the linking of ins_oemagent.mk and ins_ctx.mk)
If you have ever installed Oracle8i on Red Hat Linux, you may be aware of several environment variables that had to be set in your .profile or .bash_profile:
Make sure that you DO NOT set these environment variables in your profile (login) script when installing Oracle9i. They will cause the installer to fail during the linking of the OEM Agent (ins_oemagent.mk) and Context (ins_ctx.mk)!
Known Issue #3 : Oracle 9.2.0 Only : (ORA-01041 / ORA-03113 during connect after shutting down the database in same SQL*Plus session)
When shutting down the database using SQL*Plus, you will need to do one of the following in order to startup the database again: There seems to be a bug in SQL*Plus that does not allow you to perform a shutdown followed by a startup in the same SQL*Plus session.
If you attempt to perform a startup and shutdown in the same session, you will be confronted with an ORA-01041 and ORA-03113 error. What seems to be happening is a problem with the allocation of shared memory segments. If you mistakenly try this, you have two options to recover from it:

Below is an example of the problem and how to solve it by removing the shared memory segments created by the startup command after shutting down the database:

Install the Java Development Kit (JDK)
In order to use Oracle's HTTP [Apache] Server, you will need to download an appropiate JDK. This can include either Sun's JDK 1.3.1 or Blackdown 1.1.8_v3. In the past, Oracle has always recommended Blackdown. I prefer Sun's JDK myself and have been successful using it with 9i. As per the JDK documentation, install JDK under /usr/local.
Then create a symbolic link to the JDK under /usr/local/java.


  • Sun's JDK 1.3.1 Download from: http://java.sun.com
    Install as root:

    % cp j2sdk-1_3_1_01-linux-i386.bin /usr/local
      % chmod 755 j2sdk-1_3_1_01-linux-i386.bin
      % ./j2sdk-1_3_1_01-linux-i386.bin
      % ln -s /usr/local/jdk1.3.1_01 /usr/local/java
  • Blackdown 1.1.8_v3 Download from: http://www.blackdown.org
    Install as root:

    % cp jdk118_v3-glibc-2.1.3.tar.bz2 /usr/local
      % bzip2 -dc jdk118_v3-glibc-2.1.3.tar.bz2
      % tar xvf jdk118_v3-glibc-2.1.3.tar
      % ln -s /usr/local/jdk118_v3 /usr/local/java
Create Oracle Account and Directories
Create Oracle User Account: % groupadd -g 115 dba
% useradd -u 173 -c "Oracle Software Owner" -d /u01/app/oracle -g "dba" -m -s /bin/bash oracle
% passwd oracle

Create Oracle Directories:
% mkdir /u01
% mkdir /u01/app
% mkdir /u01/app/oracle
% mkdir /u01/app/oracle/admin
% mkdir /u01/app/oracle/admin/O901DB
% mkdir /u01/app/oracle/admin/O901DB/adhoc
% mkdir /u01/app/oracle/admin/O901DB/adump
% mkdir /u01/app/oracle/admin/O901DB/arch
% mkdir /u01/app/oracle/admin/O901DB/backups
% mkdir /u01/app/oracle/admin/O901DB/bdump
% mkdir /u01/app/oracle/admin/O901DB/cdump
% mkdir /u01/app/oracle/admin/O901DB/create
% mkdir /u01/app/oracle/admin/O901DB/dba
% mkdir /u01/app/oracle/admin/O901DB/exp
% mkdir /u01/app/oracle/admin/O901DB/logbook
% mkdir /u01/app/oracle/admin/O901DB/pfile
% mkdir /u01/app/oracle/admin/O901DB/release
% mkdir /u01/app/oracle/admin/O901DB/report
% mkdir /u01/app/oracle/admin/O901DB/tuning
% mkdir /u01/app/oracle/admin/O901DB/udump
% mkdir /u01/app/oracle/product
% chown -R oracle:dba /u01/app/oracle

% mkdir /u03
% mkdir /u03/app
% mkdir /u03/app/oradata
% mkdir /u03/app/oradata/O901DB
% chown -R oracle:dba /u03/app/oradata

% mkdir /u04
% mkdir /u04/app
% mkdir /u04/app/oradata
% mkdir /u04/app/oradata/O901DB
% chown -R oracle:dba /u04/app/oradata

% mkdir /u05
% mkdir /u05/app
% mkdir /u05/app/oradata
% mkdir /u05/app/oradata/O901DB
% chown -R oracle:dba /u05/app/oradata

% mkdir /u06
% mkdir /u06/app
% mkdir /u06/app/oradata
% mkdir /u06/app/oradata/O901DB
% chown -R oracle:dba /u06/app/oradata

% mkdir /u07
% mkdir /u07/app
% mkdir /u07/app/oradata
% mkdir /u07/app/oradata/O901DB
% chown -R oracle:dba /u07/app/oradata

% mkdir /u08
% mkdir /u08/app
% mkdir /u08/app/oradata
% mkdir /u08/app/oradata/O901DB
% chown -R oracle:dba /u08/app/oradata

% mkdir /u09
% mkdir /u09/app
% mkdir /u09/app/oradata
% mkdir /u09/app/oradata/O901DB
% chown -R oracle:dba /u09/app/oradata

% mkdir /u10
% mkdir /u10/app
% mkdir /u10/app/oradata
% mkdir /u10/app/oradata/O901DB
% chown -R oracle:dba /u10/app/oradata

% mkdir /opt/bin
% chown oracle:dba /opt/bin

Oracle Environment Variable Settings:
An example ".bash_profile" is provided in the Configuration Files / Scripts section below.
Run the Oracle Installer
As the "oracle" user account:
Configuration Files / Scripts
Example:
    .bash_profile
$HOME/.bash_profile for the "oracle" user account.
    initO901DB.ora
Sample instance parameter script for Oracle9i. Place this file in ~oracle/admin/O901DB/pfile before running the RUN_CRDB.sh script below.
    create_database901.tar
An example "create database" set of scripts. Untar the file to ~oracle/admin/O901DB/create. If you decide to change the name of the ORACLE_SID, here are the files that need to be changed:
  • crdb.sh
  • create_database.sql
  • postDBCreation.sql
The main script to run is: RUN_CRDB.sh.

Monday, May 31, 2010

Print, scan and fax drivers for Linux

Installer Walkthrough

Step 1: Download the Automatic Installer (.run file)

Download HPLIP 3.10.5:

Download Link:http://space.dl.sourceforge.net/project/hplip/hplip/3.10.5/hplip-3.10.5.ru

Step 2: Run the Automatic Installer

Running the installer requires that you open a command shell to enter commands. To do this, open a terminal or console window
In the terminal/console, enter the following commands (type all the text after the $ character and then press enter):
Note
These instructions assume that the hplip-3.10.5.run file was downloaded to your Desktop directory. You may have to adjust the 'cd' command based on where your web browser saved the file on your system.


Step 3: Select the Install Type

Select the install mode: Automatic (enter an 'a') or Custom (enter a 'c'). We recommended that most users select the Automatic install mode


Step 4: Verify your Linux Distribution

Note
Ensure the installer detected the correct Linux distribution. Different Linux versions use different install procedures if the incorrect version is selected, the installer may fail.


Step 5: Select HPLIP Options to Enable

Note
Enter 'y' to enable parallel support. By default, parallel support is disabled.


Step 6: Enter Your root/Superuser User Password


Step 7: Read the Installation Notes

Depending on your Linux distribution some steps may need to be completed before going further with the HPLIP install. Please follow any directions given.


Step 8: Detect Any Missing Dependencies

The installer will now detect what dependencies your system will need to install before installing HPLIP. In addition any package manager clean up steps will be ran. These are executed to try and minimze any potential package manager problems.


Step 9: Download and Install Any Missing Dependencies

If your system is missing any dependencies they are now downloaded and installed.


Step 10: './configure' and 'make' will run

./configure prepares HPLIP for install as well as your system is verified to have all the required dependencies for HPLIP.
'make' is then executed. Make compiles ("builds") HPLIP for your system.


Step 11: 'make install' is Run

'make install' is the actual install procedure, this step is where HPLIP is actually being installed to your system.


Using 'hp-setup' to configure your printer

This guide will walk you through configuring your printer using 'hp-setup'.

Step 12: Select How Your Printer will be Connected to Your Computer

The first step is to select the printer connection type:

screenshots_sm_hp_setup_step1

Step 13: Select the Printer to be Configured

Next the setup tool will display printers detected (depending on the connection type selected):

screenshots_sm_hp_setup_step2

Step 14: Select the PPD file (or driver) to be Used for Your Printer

The PPD files (drivers) which are most similar to your printer are displayed. Select the appropriate PPD file for your printer.
Note
Usually you will want to select the recommended PPD file.

screenshots_sm_hp_setup_step3

Step 15: Enter any Printer Information You Wish to Update/Change

Enter your printer information:

screenshots_sm_hp_setup_step4

Step 16: Confirm the Printer Settings and Finish the Configuration Process

Click "Finish" to complete the printer setup process:

screenshots_sm_hp_setup_step5

Friday, April 9, 2010

Linux Software RAID10

Linux Software RAID10


Creating RAID Arrays in Linux during installation is an easy task (using the disk druid or any such graphical installers). it's best to keep your root filesystem out of both RAID and LVM for easier management and recovery.


Linux RAID and Hardware


I've seen a lot of confusion about Linux RAID, so let's clear that up. Linux software RAID has nothing to do with hardware RAID controllers. You don't need an add-on controller, and you don't need the onboard controllers that come on most motherboards. In fact, the lower-end PCI controllers and virtually all the onboard controllers are not true hardware controllers at all, but software-assisted, or fake RAID. There is no advantage to using these, and many disadvantages. If you have these, make sure they are disabled.

Ordinary PC motherboards support up to six SATA drives, and PCI SATA controllers provide an easy way to add more. Don't forget to scale up your power and cooling as you add drives.

If you're using PATA disks, only use one per IDE controller. If you have both a master/slave on a single IDE controller, performance will suffer and any failure risks bringing down both the controller and the second disk.


GRUB Follies


GRUB Legacy's (v. 0.9x) lack of support for RAID is why we have to jump through hoops just to boot the darned thing. Beware your Linux's default boot configuration, because GRUB must be installed to the MBRs of at least the first two drives in your RAID1 array, assuming you want it to boot when there is a drive failure. Most likely your Linux installer only installs it to the MBR of the drive that is first in the BIOS order, so you'll need to manually install it on a secondary disk.

First open the GRUB command shell. This example installs it to /dev/sdb, which GRUB sees as hd1 because it is the second disk on the system:


root@uberpc ~# grub

GNU GRUB version 0.97 (640K lower / 3072K upper memory)


Minimal BASH-like line editing is supported. For the first word, TAB lists possible command completions. Anywhere else TAB lists the possible completions of a device/filename.


grub> root (hd1,0)

Filesystem type is ext2fs, partition type 0xfd


grub> setup (hd1)

Checking if "/boot/grub/stage1" exists... yes

Checking if "/boot/grub/stage2" exists... yes

Checking if "/boot/grub/e2fs_stage1_5" exists... yes

Running "embed /boot/grub/e2fs_stage1_5 (hd1)"... 17 sectors are embedded. succeeded

Running "install /boot/grub/stage1 (hd1) (hd1)1+17 p (hd1,0)/boot/grub/stage2 /boot/grub/grub.conf"... succeeded

Done.


You can do this to every disk in your RAID 1 array. /boot/grub/menu.lst should have a default entry that looks like something like this:


title Ubuntu 7.10, kernel 2.6.22-14-generic, default root (hd0,0)

kernel /boot/vmlinuz-2.6.22-14-generic root=/dev/md0 ro

initrd /boot/initrd.img-2.6.22-14-generic


Let's say hd0,0 is really /dev/sda1. If this disk fails, the next drive in line becomes hd0,0, so you only need this single default entry.

GRUB sees PATA drives first, SATA drives second. Let's say you have two PATA disks and two SATA disks:


/dev/hda

/dev/hdb

/dev/sda

/dev/sdb


GRUB numbers them this way:


hd0

hd1

hd2

hd3

If you have one of each, /dev/hda=hd0, and /dev/sda=hd1. The safe way to test your boot setup is to power off your system and disconnect your drives one at a time.


Managing Linux RAID With mdadm


There are still a lot of howtos on the Web that teach the old md command and raidtab file. Don't use these. They still work, but the mdadm command does more and is easier.


Creating and Testing New Arrays


Use this command to create a new array:


# mdadm -v --create /dev/md1 --level=raid10 --raid-devices=2 /dev/hda2 /dev/sda2


You may want to have a hot spare. This is a partitioned, formatted hard disk that is connected but unused until an active drive fails, then mdadm (if it is running in daemon mode, see the Monitoring section) automatically replaces the failed drive with the hot spare. This example includes one hot spare:


# mdadm -v --create /dev/md1 --level=raid10 --raid-devices=2 /dev/hda2 /dev/sda2 --hot-spares=1 /dev/sdb2


You can test this by "failing" and removing a partition manually:


# mdadm /dev/md1 --fail /dev/sda2 --remove /dev/sda2


Then run some querying commands to see what happens.

When you have more than one array, they can share a hot spare. You should have some lines in /etc/mdadm.conf that list your arrays. All you do is create a share group by adding lines as shown in bold:


ARRAY /dev/md0 level=raid1 num-devices=2 UUID=004e8ffd:05c50a71:a20c924c:166190b6

shared-group=share1

ARRAY /dev/md1 level=raid10 num-devices=2 UUID=38480e56:71173beb:2e3a9d03:2fa3175d

shared-group=share1


View the status of all RAID arrays on the system:


$ cat /proc/mdstat

Personalities : 'linear' 'multipath' 'raid0' 'raid1' 'raid6' 'raid5' 'raid4' 'raid10'

md1 : active raid10 hda2'0' sda2'1'

6201024 blocks 2 near-copies '2/2' 'UU'


md0 : active raid1 hda1'0' sda1'1'

3076352 blocks '2/2' 'UU'


The "personalities" line tells you what RAID levels the kernel supports. In this example you see two separate arrays: md1 and md0, that are both active, their names and BIOS order, and the size and RAID type of each one. 2/2 means two of two devices are in use, and UU means two up devices.


You can get detailed information on individual arrays:


# mdadm --detail /dev/md0

Is this partition part of a RAID array? This displays the contents of the md superblock, which marks it as a member of a RAID array:


# mdadm --examine /dev/hda1

You can also use wildcards, like mdadm --examine /dev/hda*.


Monitoring


mdadm itself can run in daemon mode and send you email when an active disk fails, when a spare fails, or when it detects a degraded array. Degraded means a new array that has not yet been populated with all of its disks, or an array with a failed disk:


# mdadm --monitor --scan --mail=shiroy.p@hcl.in --delay=2400 /dev/md0


Your distribution may start the mdadm daemon automatically, so you won't need to run this command. Kubuntu controls it with /etc/init.d/mdadm, /etc/default/mdadm, and /etc/mdadm/mdadm.conf, so all you need to do is add your email address to /etc/mdadm/mdadm.conf.


Starting, Stopping, and Deleting RAID


Your Linux distribution should start your arrays automatically at boot, and mdadm starts them at creation.

This command starts an array manually:


# mdadm -A /dev/md0


This command stops it:


# mdadm --stop /dev/md0


You'll need to unmount all filesystems on the array before you can stop it.

To remove devices from an array, they must first be failed. You can fail a healthy device manually:


# mdadm /dev/md1 --fail /dev/sda2 --remove /dev/sda2


If you're removing a healthy device and want to use it for something else, or just want to wipe everything out and start over, you have to zero out the superblock on each device or it will continue to think it belongs to a RAID array:


# mdadm --zero-superblock /dev/sda2

Adding Devices

You can add disks to a live array with this command:


# mdadm /dev/md1 --add /dev/scd2


This will take some time to rebuild, just like when you create a new array.

That wraps up ourtour of RAID 10 and mdadm.


Resources


man mdadm

Serial ATA (SATA) for Linux

GRUB manual

BAARF: Battle Against Any RAID Five

Basic RAID


Visit my BLOG

Tuesday, March 30, 2010

How can I create a disk partition on a disk that is greater than 2TB in size?

  • The fdisk command only supports the legacy MBR partition table format (also known as msdos partition table)
    • MBR partition table do not support disks greater than 2.1TB, and therefore fdisk is also unable to create partition tables on these devices.
    • Note that some older versions of fdisk may permit a larger size to be created but the resulting partition table will be invalid.
  • The parted command can create disk labels using MBR (msdos), GUID Partition Table (GPT), SUN disk labels and many more types.
    • The GPT disk label overcomes many of the limitations of the DOS MBR including restrictions on the size of the disk, the size of any one partition and the overall number of partitions.
    • Note that booting from a GPT labelled volume requires firmware support and this is not commonly available on non-EFI platforms (including x86 and x86_64 architectures).

    Procedure:
  • Use the parted tool to access the partition table of the device:
    # parted /dev/sdj
    Using /dev/sdj
    Welcome to GNU Parted! Type 'help' to view a list of commands.
    (parted)
    
    
  • Once at the parted prompt, create a GPT label on the disk:
    (parted) mklabel
    Warning: The existing disk label on /dev/sdj will be destroyed and all data on this disk will be lost. Do you want to continue?
    Yes/No? Yes                                                                 
    New disk label type?  [gpt]? gpt                                          
    (parted)
    Note: This will remove any existing partition table and partitions on the device.
  • Use the print command to show the size of the disk as reported by parted.  We need this later:
    (parted) print                                                            
    
    Model: Linux device-mapper (dm)
    Disk /dev/sdj: 5662310.4MB
    Sector size (logical/physical): 512B/512B
    Partition Table: gpt
    
    Number  Start  End  Size  File system  Name  Flags
    
    
  • Create a primary partition on the device.  In this example, the partition will encompass the entire disk (using size from the step above):
    (parted) mkpart primary 0 5662310.4MB
    
    
  • Unlike fdisk, you do not have to write out the partition table changes with parted.  Display your new partition and quit.
    (parted) print
    
    Model: Linux device-mapper (dm)
    Disk /dev/mapper/VolGroup00-gpttest: 5662310.4MB
    Sector size (logical/physical): 512B/512B
    Partition Table: gpt
    
    Number  Start   End          Size         File system  Name     Flags
     1      17.4kB  5662310.4MB  5662310.4MB               primary       
    
    (parted) quit                                                             
    Information: Don't forget to update /etc/fstab, if necessary.
    
    
  • You can now create a filesystem on the device /dev/sdj1

Monday, March 8, 2010

View Config Files Without Comments

I've been using this grep invocation to trim comments out of config files. Comments are useful, but difficult to get only the active configuration entries which will be less than 20 or 25 lines from a very long file.

$ grep ^[^#] /etc/ntp.conf

The regex ^[^#] matches the first character of any line, as long as that character that is not a #. Because blank lines don't have a first character they're not matched either, resulting in a nice compact output of just the active configuration lines.

Your comments are always welcome.

Regards
Shiroy Pigarez

Setup Your Linux Server to Use a Serial Console

Do you have a linux server without a keyboard or monitor? Need to administer the server on-site but don't want to lug over a monitor and keyboard (or kvm)? Then setup the server to output the console to a serial port and use screen/minicom (Hyperterminal or putty in Windows) to console into the server over a serial cable.

To set this up, you need to edit /etc/inittab to tell it to start a terminal on the serial port for the console. If you want to see the kernel load and see all the services start then you also need to configure grub to use the serial port as well.

Edit /etc/inittab and add the line starting with "co" to the file (substitute the device name of your serial port for ttyS0 below):

co:2345:respawn:/sbin/agetty ttyS0 9600 vt100-nav # ADD THIS LINE
1:2345:respawn:/sbin/mingetty tty1
2:2345:respawn:/sbin/mingetty tty2
3:2345:respawn:/sbin/mingetty tty3
4:2345:respawn:/sbin/mingetty tty4
5:2345:respawn:/sbin/mingetty tty5
6:2345:respawn:/sbin/mingetty tty6

To watch the kernel load (and all the services) you must configure grub to enable the console option in the kernel on boot. Edit /boot/grub.conf and add the "serial" and "terminal" lines below, and modify the "kernel" line to include the console specification:

serial --unit=0 --speed=9600
terminal --timeout=5 serial console
title CentOS (2.6.9-55.0.2.EL)
root (hd1,0)
kernel /vmlinuz-2.6.9-55.0.2.EL ro root=/dev/VolGroup00/LogVol00 console=ttyS0,9600n8
initrd /initrd-2.6.9-55.0.2.EL.img

To connect to the server just hook a serial cable from your laptop to the server. Set the speed to 9600, no parity and 8bits. Boot up the server, you should see kernel output, services load, and finally a login prompt. After you disconnect you can easily re-connect and log in: just fire up your terminal emulator, connect your serial cable, hit enter a few times and you should get a prompt to log in.

Thursday, January 14, 2010

Cretae user Account in Linux

To create a new user account under any Linux distribution use command called useradd. The system administrator is responsible for creating account. Login as root user (or use sudo command).

useradd command syntax

useradd [options] {username}
Depending on command line options, the useradd command will update system files (/etc/passwd and /etc/shadow file with password) and may also create the new user's home directory and copy initial files.

Linux add a new user called hcl

Type the command as follows:
useradd hcl
Set a password for hcl:
passwd hcl
Without password user account will be in locked status. To unlock the account, you need to use above passwd command. Use passwd command to assign a password and set password aging guidelines.

Set account disable date

You can set date for the account to be disabled in the format YYYY-MM-DD with -e option while creating account itself:
useradd -e {yyyy-mm-dd} {username}
useradd -e 2008-12-31 jerry

Set default password expiry

The -f {days} option set number of days after the password expires until the account is disabled. (If 0 is specified, the account is disabled immediately after the password expires. If -1 is specified, the account is not be disabled after the password expires.)
useradd -f {days} {username}
useradd -e 2009-12-31 -f 30 jerry

Friday, January 8, 2010

Edit Boot Loader to add/modify/delete entries in openSUSE

To edit the boot loader configurations in openSUSE,
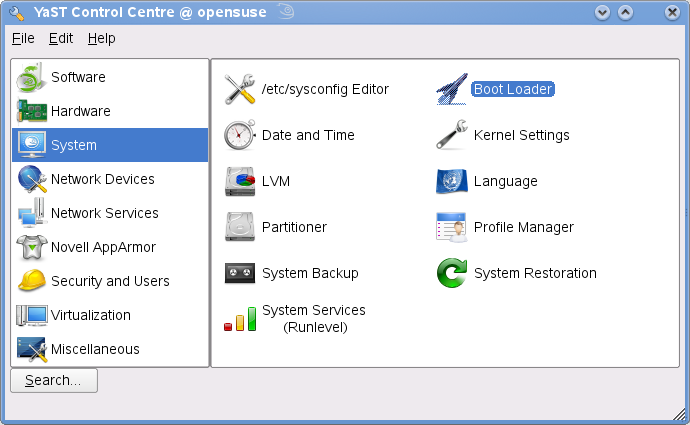
From menu, click Computer – YaST

Click System – Boot Loader. This launches the Boot Loader settings editor.


Delete Entry
 Once in, to delete an entry, select the entry and click Delete.


Change Order
To move up or down in the order, select the entry and click Up or Down as required


Modify Entry
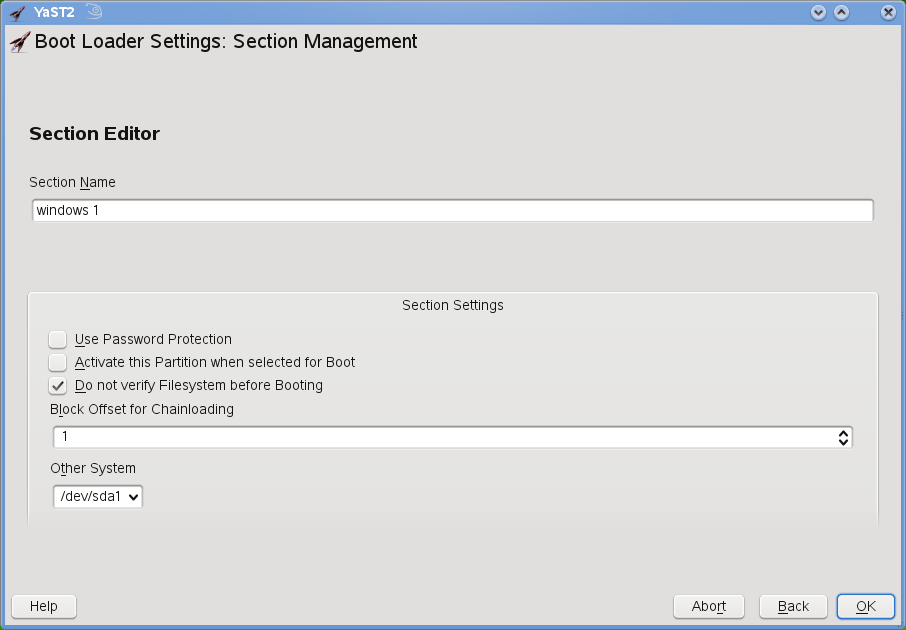
To edit an entry for instance to change the display Name or set password protection, select the entry and click Edit.


Set or Change Default
To set an entry as default, select the entry and click “Set as Default

Advance Edits & Options

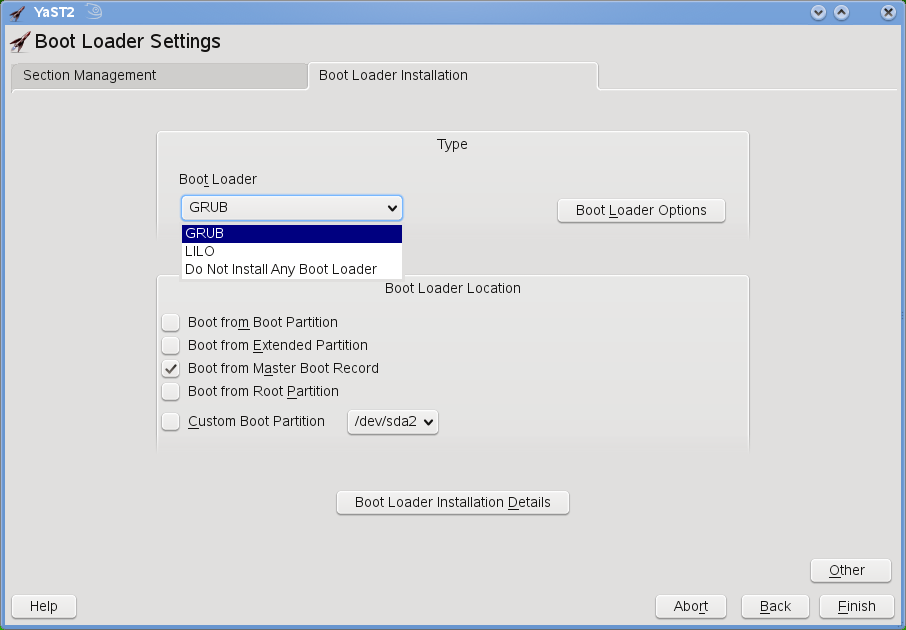
To edit the config files for the selected boot loader (default is GRUB), click other button and select the options like “edit configuration files” or start from scratch”


For advanced options like changing the default GRUB boot loader to say LILO, click the “Boot Loader Installation” tab.


Once done, click Finish to apply the changes to the system.

Download E-Book Linux Bible 2009 Edition PDF


Linux Bible 2009 Edition:

Boot up Ubuntu, Fedora, KNOPPIX, Debian, openSUSE, and more/by Christopher Negus (Author) .As the ultimate resource on the basics of the Linux desktops, servers, and programming tools, this book is written by the ultimate author on all things Linux.
This transition resource is ideal if you are making the move from Windows or Macintosh to using Linux as your desktop system, and explains the Linux technology, offers detailed installation instructions, and includes step-by-step descriptions of key desktop and server components. You’ll relish the in-depth descriptions that will help you choose the best Linux distribution to suit your needs.
Run the world's most popular free operating system on your own computer
Get in on the Linux phenomenon! Play music and games, publish on paper or on the Web, and communicate over the Internet. This comprehensive book includes step-by-step instructions and software for 18 different Linux distributions. Whether you are an enterprising do-it-yourselfer or an aspiring Linux professional, you can start here on your path to software freedom.
*Master Linux for desktops, servers, and workstations
*Find, install, and use loads of free and open source software
*Create your own cool apps with useful programming tools
*Launch all your music, video, images, and documents in Linux
*Browse, e-mail, or chat over the Internet from a Linux desktop
*Set up your own e-mail and Web (LAMP) servers
*Make safe connections with firewalls and other security tools


Wednesday, December 23, 2009

Change the GRUB Menu Timeout on Ubuntu

When your Ubuntu system boots, you will see the GRUB menu if you hit
the Esc key, or if you've enabled the

menu to show by default. The only issue with this is that the default
timeout is only 3 seconds. You may want to

increase this amount… or you may even want to decrease it.

Open up the /boot/grub/menu.lst file in your favorite text editor

sudo gedit /boot/grub/menu.lst

Now find the section that looks like this:

 ## timeout sec

# Set a timeout, in SEC seconds, before automatically booting the
default entry

 # (normally the first entry defined).

timeout 3

The timeout value is in seconds. Save the file, and when you reboot
you will have that many seconds to choose the menu item you want.

Debian shows on monitor as "Not Supported"


Boot into single user mode and do the
  'dpkg-reconfigure xserver-xorg' command.
There, to be safe start with only selecting 640x480 and 60Hz, when
given the choice.

DOS commands and equivalent linux commands

DOS commands Linux command Action
assign ln Create a file or directory link
/? man Help about the command
break on trap Trap ctrl-break / Trap signals
cd cd Change directory
chdir pwd Display directory location
cls clear Clear screen
copy cp Copy a file
date date Displays or sets the date
del rm Deletes one or more files
dir ls Displays a list of files and subdirectories in a directory
doskey /h history history List command history
echo echo Displays messages, or turns command-echoing on or off
edit vim (or other editor) Editor to edit files
exit exit Exit the command prompt
fc diff Compare two files and show differences
find grep Searches for a text string in a file or files
format mke2fs or mformat Formats a disk
find grep Look for a word in files given in command line
hostname hostname Print host name of computer
ipconfig ifconfig Display/configure network interface
mem free Displays the amount of used and free memory in your system
mkdir mkdir Create a Directory
more more or even less Displays output one screen at a time
move mv Moves files and renames files and directories
ping ping Send packets to a network host
route print route -n Print routing table
reboot shutdown -r now Reboot system
ren mv Renames a file or files
set set or env List all environment variables
tracert traceroute Show routes and router hops to given network destination
time date Displays or sets the system time
tasklist ps -aux top top List executable name, process ID number and memory usage of active processes
type cat Dump contents of a file to users screen
ver Uname -a Operating system/shell version
win startx Start x-windows
xcopy cp -R Copy all file of directory recursively