We aims to provide in house support to our colleagues and the Engineers for any sort of technical help.You can raise your technical queriesor browse for any solutions for the probelms through our groups.We provide driver support,OS support and utility support too to make your life a better one.

Our Mission

Transform HCL Infosystems LTD into services and solution centric organization

Monday, June 21, 2010

“553 Sorry, that domain isn’t in my list of allowed rcpthosts” “Relaying prohibited” error in MS OUTLOOK 2007

You get this error when the outgoing server (SMTP) does not recognize you as an authorized user. This can happen for various reasons but in general you’ll encounter this when you want to send a message through an SMTP server that is on another network than you are currently connected to.

Enable authentication for your SMTP server

When this happens, you can configure your outgoing server to use authentication before sending this message. To do this, you must first open your account settings;
• Outlook 2010
File ---Account Settings--Account Settings…
• Outlook 2007
Tools---Account Settings
• Outlook 2003 and 2002/XP
Tools----E-mail Accounts---button Next


Once you have opened the list of configured accounts;
Select your mail account--- button Change---button More Settings--tab Outgoing Server--- select: My outgoing server (SMTP) requires authentication

Note: Some ISPs have configured their SMTP servers to never allow sending messages from another network. In this case you can ask the administrator of the network you are connected to (in our example that would be the administrator of the hotel network) for their SMTP server settings or use the web mail provided by your ISP instead.

Enable authentication for your SMTP server

Thursday, June 17, 2010

HP LaserJet P2055dn and P2055x Printers - Manual IP Setting through Control Panel

 
There are 3 ways to configure the IP address: HP ToolboxFX, embedded Web server (EWS) and the control panel on P2050 series printers (P2055n/P2055x). The control panel can be used to manually and automatically configure the IP address. This document describes how to configure the IP address manually using the control panel.

NOTE: Specific automatic IP modes (such as BOOTP, DHCP, or AutoIP) can be changed by using the embedded Web server or HP ToolboxFX only. If AutoIP is disabled, HP default IP (192.0.0.192) will automatically be enabled.
  1. On the control panel, press OK .
  2. Use the arrow buttons to select Network config. , and then press OK .
  3. Use the arrow buttons to select CFG TCP/IP , and then press OK .
  4. Use the arrow buttons to select BOOTP , make sure the value is No , and then press OK .
  5. Use the arrow buttons to select DHCP , make sure the value is No , and then press OK .
  6. Use the arrow buttons to select IP BYTE 1 , and then press OK .
  7. Use the arrow buttons to change the value of IP BYTE 1 , and then press OK .
  8. Repeat steps 6 and 7 for IP BYTE 2 , IP BYTE 3 , and IP BYTE 4 . Also, repeat steps 6 and 7 for the Subnet Mask (SM BYTE 1, SM BYTE 2, SM BYTE 3, SM BYTE 4 ) and Default Gateway (GW BYTE 1, GW BYTE 2, GW BYTE 3, GW BYTE 4 ).

    NOTE: Example: If the IP address is 192.168.0.1
    • IP byte 1=192
    • byte 2=168
    • byte 3 =0
    • byte 4 =1
  9. Use the Back or Cancel button to leave the Network config. menu.
  10. Settings will take effect after Step 9 and the printer has returned to Ready .
After performing the following procedure, print a Network Report page as follows:
  1. Press OK
  2. Press the down arrow to select Reports , and then press OK.
  3. Press the down arrow to select the Network Report , and then press OK .
To make these settings permenant, press and hold the Cancel and down arrow keys simultaneously until "Permanent Storage init " displays on the control panel.

Wednesday, June 16, 2010

Download speccy -A decent Hardware Information Utility

Speccy will give you detailed statistics on every piece of hardware in your computer. Including CPU, Motherboard, RAM, Graphics Cards, Hard Disks, Optical Drives, Audio support. Additionally Speccy adds the temperatures of your different components, so you can easily see if there's a problem!
  • Processor brand and model
  • Hard drive size and speed
  • Amount of memory (RAM)
  • Graphics card
  • Operating system
At first glance, Speccy may seem like an application for system administrators and power users. It certainly is, but Speccy can also help normal users, in everyday computing life.
If you need to add more memory to your system, for example, you can check how many memory slots your computer has and what memory's already installed. Then you can go out and buy the right type of memory to add on or replace what you've already got.

Download latest version click here

Get the Host ID Number on Solaris

On Solaris, the hostid is similar to the hostname. To determine the hostid of a Solaris box, there are a couple of options to follow.
sysdef -h
The sysdef utility gives you system information, including hardware and system information.
Example:
# sysdef -h
*
* Hostid
*
 3adf6e7c
hostid
The hostid utility is a shortcut command to quickly get the hostid.
Example:
# hostid
*
* Hostid
*
 3adf6e7c

Find Detailed Hardware Information with Speccy

Want to know exactly what your computer is made of?  Speccy is a new free tool from the developers of CCleaner that gives you detailed information about your computer hardware.
Note: Speccy is currently a public beta, so if you’d rather not use beta software, wait to use it until it’s fully released. 
Speccy is available both in an exe installer and a portable version.  Choose the one that works best for your needs, and download.  The portable version is especially useful for checking hardware on others’ computers, such as one your considering purchasing at a store.  If you use the portable one, simply run it; otherwise, run the installer and set it up on your computer.
Get your hardware info
Once setup is out of the way, you can see all of your system’s hardware information.  Speccy needs to run in administrative mode, and brings up a UAC prompt by default.  If it doesn’t, you may see this warning.
sshot-1
It will still run the program, but will not have all the information.  Just exit the program and run it again in administrative mode.  To do this, right click on the program and select “Run as Administrator.”
sshot-26
Now you can see a detailed overview of all of your computer’s hardware.
sshot-22
You can view more detailed information by clicking each of the sections.  The CPU panel gives you advanced information about the technologies your processor supports, its code name and family, bus speeds, temperature, and more.
sshot-25
Clicking on one of the graph indicators shows you the temp or speed over time while Speccy was running.
sshot-27
It shows you the brand, part number, frequency, latency, and more, which is really great information to have if you’re considering upgrading or adding more RAM.
sshot-29
The motherboard page even tells you what chipset and BIOS you have.
sshot-30
Speccy gives you very detailed information about your hardware, and this can be very useful information when troubleshooting problems.  It lets you save a snapshot of your computer’s current hardware information so you can view your current information later, or could even send it to a support team so they could also see what is in your computer.
sshot-2010-02-17-[18-11-45]
Speccy will run on XP, Vista, 2000, 2003, and Windows 7 (32 & 64-bit versions). Remember once again, Speccy is still a beta program, so only use it now if you feel comfortable running unreleased programs.  Otherwise, wait and try it in a couple weeks, as Priform says it should be finished at that time.

What is hiberfil.sys and How Do I Delete It?

You're no doubt reading this article because there's a gigantic hiberfil.sys file sitting in the root of your drive, and you want to get rid of it to free up some space... but you can't!
Luckily, you actually can delete it, and today we'll show you how.
image
The more memory you have in your PC, the bigger the file will be.
So What is hiberfil.sys Anyway?
Windows has two power management modes that you can choose from: one is Sleep Mode, which keeps the PC running in a low power state so you can almost instantly get back to what you were working on. The other is Hibernate mode, which completely writes the memory out to the hard drive, and then powers the PC down entirely, so you can even take the battery out, put it back in, start back up, and be right back where you were.
Hibernate mode uses the hiberfil.sys file to store the the current state (memory) of the PC, and since it's managed by Windows, you can't delete the file.
image
So if you never use it, and want to disable Hibernate mode, keep reading. Personally I stick with Sleep Mode the vast majority of the time, but I do use Hibernate quite often.
Disable Hibernate (and Delete hiberfil.sys) in Windows 7 or Vista
You'll need to open an administrator mode command prompt by right-clicking on the command prompt in the start menu, and then choosing Run as Administrator. Once you're there, type in the following command:
powercfg -h off

You should immediately notice that the Hibernate option is gone from the Shut down menu.
image
You'll also notice that the file is magically gone!
image

Disabling Hibernate Mode in Windows XP
It's a lot easier in Windows XP to get rid of Hibernate mode.Just head into Control Panel –> Power Options, and then find the Hibernate tab.
1
Uncheck the box, reboot your PC, and then you can delete the hiberfil.sys file.

Tuesday, June 15, 2010

Windows Update - Enable / Disable Automatic Updates in Windows 7

Windows Updates helps to keep your Windows 7 computer up to date with all the security fixes and improvements. It is highly recommended to Turn this On in automatic mode for a smooth Windows use.

How ever if you wish to play with varous options of Windows Update in Windows 7 here is a guide to explain it briefly.


1. First of all click the Start button to view the Start Menu. Then choose the Control Panel option.


2. The Control Panel window opens up now.


Click the System and Security link from the Control Panel window.

3. The System and Security section of Control Panel opens up. Here you can see the Windows Update link.


As you can see in the above screenshot there is direct links to the important Windows Update option here it self in slightly small fonts, such as Turn automatic updating on or off, Check for updates, View install updates . You may choose the required option directly from here. But we are going ahead to the dedicated Windows Updates section of the Windows 7 control panel by clicking the main Windows update link.

4. So now we are at the Windows Update section of our Window 7 Control panel. You can manually look up for any new updates by clicking the Check for updates button under the heading Check for updates for your computer fromthis window. In order to modify the Windows update option click the Change settings in the left pane.


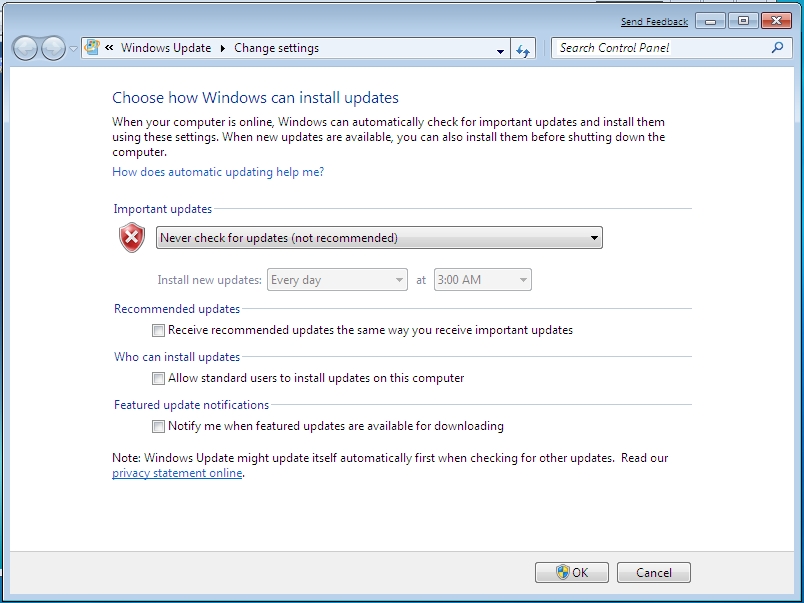
5. Here you may change the way Windows 7 download and install updates. Configurable option include Important Updates , Recommended updates , Who can install updates and Featured update notifications .


Important updates provide significant benefits, such as improved security and reliability. Recommended updates can address non-critical problems and help enhance your computing experience. Optional updates are not downloaded or installed automatically.

6. Important Updates can be configured in four ways:

  • Install updates automatically (recommended)
  • Download updates but let me choose whether to install them
  • Check for updates but let me choose whether to download and install them
  • Never check for updates (not recommended)
If you choose Install updates automatically , there are additional options to schedule the update at a convenient time.


or if Never check for updates is selected:


In order to have the same behavor for Recommended updates also tick the Receive recommended updates the same way you receive important updates check box.

You can also choose if you want to allow anyone to install updates by selecting the Allow standard users to install updates check box.

Choose the other options appropriately and click OK to save the settings. If you are prompted for an administrator password or confirmation, type the password or provide confirmation.

A configured Windows Update window will look like this: